
Did you know that we have 2.87 million Google Play Store apps and 1.96 million Apple App Store apps?
Almost every user has a smartphone with an internet connection, which is why we have many many users of mobile apps. If there’s a website or platform that also supports a mobile app, every user would prefer downloading an application for a seamless, quick, and hassle-free experience.
However, creating an application that caters to the requirements of various people internationally requires multilingual support. Many visitors of the app would love reading the content on your page in their preferred language. When you fail to offer a choice to the user, the foot traffic automatically drops.
For this reason, in this article, we guide you through the stepwise process on how one can implement a multilingual support for a React Native.
-

Follow our tech founder for more valuable tips, tricks, learning, content and future opportunities
What Is A Multilingual App?
Before we move to the implementation, let’s understand what is a multilingual app.
A multilingual application is an app which supports more than one language. We can provide language change in multiple places as listed below,
- During a registration process one can select the preferred language.
- On the common header where the language can be changed at any point of time.
- Under the user preferences.
Why Is Multilingual Setup Important?
It is necessary to have a multilingual set up to support your users and modern business. When you communicate with your user in a language of their choice, you are able to create a nurturing relationship that leads to easy conversion.
- Reach a wider audience with a multilingual app. It helps people from different regions to view and understand your services and content.
- Reduce your drop rate, as people who don’t speak and understand your language can change the language of the content on the app easily.
- Rank better in the international Search Engine Results Page(SERP). Since you are able to offer content appropriate for a wider audience, SERPs rank you better.
- Improve your brand image and awareness with multilingual support.
Stepwise Guide For Multilingual Setup in React Native
Building an international app requires multilingual support. Let’s start exploring how you can set up multilanguage in React Native.
Different Approaches For Multilingual Setup in a React Native App
While setting up a multilingual app in React Native, you have two different approach options as below:
Language change based on mobile settings:
One can pick the location of the user based on the phone setting and set up the default language accordingly. For instance, in India, according to the phone settings and location of the user, the language can be set to the preferred regional language based on the type of multilingual setup.
Default Language
More popular method for multilingual setup in React Native is setting a default language and then offering a choice to change it later. This type of multilingual setup is common in many apps. When the user downloads the app for the first time, the contents and functions of the app are in English. However, there’s an option in the Settings or Profile to set a different language as default.
While we are referring to English as the default language here, as it is commonly used, you can set up a different default language as well.
Multilingual Setup in React Native
**In this stepwise guide, we will set up multilingual support via the second option. This means we are going to set up one default language (Read: English) and offer an option to change language (To Norwegian) once the app is downloaded by the user.
In every app, a multilingual setup is a two-fold process. Firstly, we achieve static text translation to convert the static text of the app to another language. Secondly, we ensure changing of date and time according to the location of the user.
Static Text Translation
Achieving static text translation means converting the language of static content on the application. This includes changing the language of the following:
- App content
- Buttons
- Labels
- Validation messages
- Form content
- Call To Action(CTA) text
Check the stepwise process to implement static text translation in React Native:
Implementation of Static Text Translation
If you have been working on React Native, you may already know that we need to utilize third-party packages for various implementations. In a multilingual setup as well, we will be utilizing two libraries for localization and internationalization: i18next and react-i18next.
I18next is a well-known framework for internationalization, which is written in Javascript. It is a comprehensive package to completely localize your product or mobile application.
React-i18next helps us separate or differentiate translations and put them in multiple files, which we refer to as namespaces when talking in the context of i18next.
While we know that we need to add i18next and react-i18next packages to React Native for localizations, how can we do that?
Any React Native package or library is added using the package manager. There are two commonly utilized package managers, Yarn and NPM. If your system already has Node.js, then you will find npm or Yarn automatically installed on it.
Npm package manager is the biggest software registry that we have. It is utilized by developers across the globe to borrow and share packages and for private development management.
Npm comes with three components:
- The website to help you find packages, create profiles, and manage the entire npm experience.
- The Command-Line Interface fuels interaction of developers with npm.
- The Registry is a database containing meta-information.
However, many developers prefer using Yarn as it is faster and offers various features, such as Workspace. The reason why Yarn is faster is that it caches your packages, which improves its speed. This package manager also maximizes your utilization of resources by parallelly executing operations, which reduces install times.
For simplicity and quick functioning, we will use the Yarn package manager in this tutorial.
1. Start by adding i18next and react-i18next packages to your project with the help of the Yarn package manager:
yarn add i18next
yarn add react-i18next
After these commands run successfully, open package.json and verify that the libraries are added under the dependencies.
2. Once you have added your packages, you need to go to App.js. Every package or library that we are going to use in a multilingual setup in React Native should be added to our major wrapper component, which is App.js.
App.js is nothing but a JavaScript library that developers utilize to make mobile web apps, which are created to behave similarly to native apps. However, this doesn’t compromise the performance of the application.
- Allows native transitions on iOS and Android
- Allows use of custom themes and widgets to change the look-and-feel accordingly
- Ability to easily navigate views and pages
So, App.js is the place where we can find the code common to our entire mobile application. It is accessible throughout our application, which is why we need to add our above packages to app.js.
In the below screenshot, we have imported the above two packages in app.js.
![]()
3. After importing your libraries to app.js, create a folder by name translation under src. Further, add two folders en(for English) and de(for German). we need to then add two json files, which we have named common.json in our example. However, you can give any name to these files according to your project requirements. There should be one common.json file for each of the languages you want to support. These two files contain the language-specific strings of two languages that we are using in our tutorial: English and German.
Let’s first see the translation resource files for English and German.
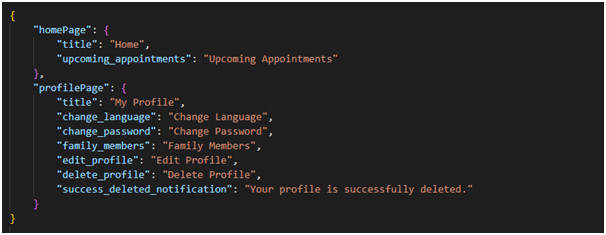
Resource file for English (en):
Resource file for German(de):
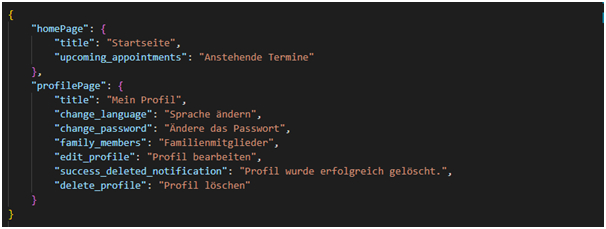
In the above files, you can see that the text strings for each language are defined. The strings are grouped by the pages or modules for better maintainability. HomePage related strings are put into one section and ProfilePage related strings into another section. Under each of the sections, then add the translated text string as a key value pair. For example, HomePage uses two static text strings title and upcoming appointment. Both are added with respective language translation in English and German.
4. When you have successfully created your resource files for languages and multilingual support, you need to import these files to app.js.
You can simply use the import function as shown in the screenshot below:
![]()
5. Once you have completed the above steps create a function in app.js as shown in the image below. This function initializes the selected language.
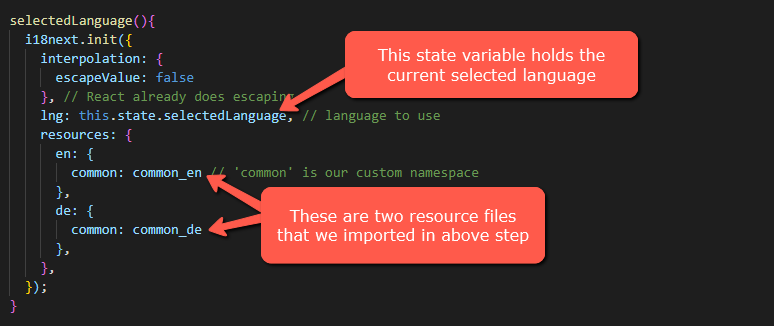
If you look closely, then in this code we are using the same resource files that we added to app.js in Step 4, which is common.json (or anything that you have named it).
Additionally, the lng is set to a state variable, which is the language that we are using for our multilingual app, such as en and de in our case. Hence, the idea here is that as the state changes, the entire app’s language changes. If the state is storing code en, then the language will change to English, and when it is storing the code de, the language will change accordingly.
6. The above function is called at the time of the initial load of the app.js with a default language. The ideal place to call this function would be ComponentDIdMount or Constructor.
7. Default language is set to the state variable. Again, this state variable value can be changed based on the selection of a language.
8. Now, you need to make some changes to the render method of app.js. We are going to enclose and add the main component and wrap it with i18nextProvider. With the help of i18nextProvider, we get translation props for our nested components.
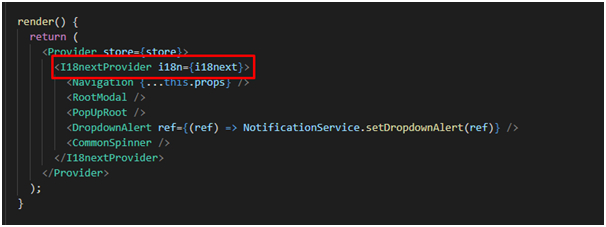
9. After finally completing all the above steps, we can use as shown below wherever we want the translated text.
![]()
Here’s how it works:
- First, we are going to destructure our variable from the screenProps, which is t in our case.
- Then, with the help of this variable t (or anything that you have chosen), we are going to pass the key. So, common.empty_screen_text is the key which we are passing through the variable.
When the app is now run, you should be able to see the text in the same language which is set as the default language in app.js.
10. Finally, now we have to set up where we want to offer the option for language change. For example, providing two flags in the header or drop-down in Settings or Profile.
Localization
Localization is a process utilized to adapt any application such that it meets the specific language requirements of a location. This procedure helps our app adjust according to different markets.
In the localization steps that we are going to perform in this assignment, we will change the date, time, and numbers on the app based on the factors in a specific region.
Understand the process of achieving data, time, and number localization in your React Native mobile applications:
Implementation of Localization
The second step of our multilingual implementation in React Native is time, date, and number localization. Similar to how we installed or imported i18next and react-i18next packages in the text translation, we will use the moment package in localization.
1. In React Native, it is actually simple to change the time and date along with the text, as it is achieved automatically when you have imported the moment package.

Above, we have first imported the moment package and moment/locale/de.
2. Create a common helper function getFormatedDate. This function returns a particular formatted date from the date string. The code might look as shown below,
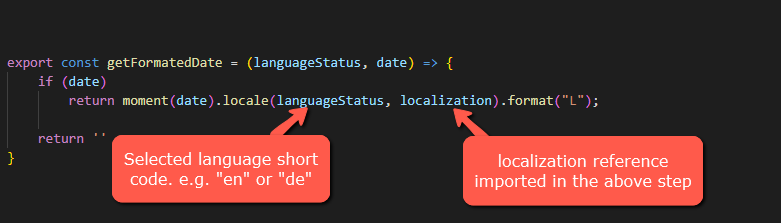
In the image above, it contains the languageStatus that is the code for your languages, such as de and en and localization which we have imported in Step 1.
Lastly, you can also set the format of the date. For example, dd/mm/yyyy or dd/mm/yy or dd/mon/yyyy. To understand the format codes, you can check this link.
Further, we can also format the time string using the moment as shown below,
Summary
To create a multilingual app in React Native, you need to follow the above steps. In the same way that we have created two resource files for English and German, you can make multiple files for different languages and import them for translation.
If you need support and guidance for a multilingual setup in React Native, you can connect with Desuvit. We are a leading software development organization offering state-of-art digital transformation solutions to various businesses. To connect with our experts, contact us.
Desuvit is a Norway-born software development company delivering Custom Software Development, Mobile Apps, and Web Applications Development for various verticals and business domains. We offer end-to-end solutions for companies with no software or IT division, Startups, and companies that need to scale their software development efforts but lack the expertise required. We help our clients in growing their businesses so we can grow with them. Some of the technologies we work with: .Net, Azure, Microservices, Azure functions(Serverless computing), React Native, Flutter, React JS, TypeScript, Angular, NServiceBus, Azure Service Bus, Azure Queues, SQL Service, MySQL, Cosmos DB, etc.
Enjoyed this article? Subscribe for more valuable and great content !
By subscribing, you agree with our privacy policy and our terms of service.