The CI/CD pipeline is utilized in Azure DevOps to create, test, and deploy a project continuously. With the help of this guide, you would be able to set up CI/CD pipeline in your Azure DevOps.
Understanding Azure DevOps
We are sure that you already understand what Azure DevOps is, but just for a quick overview, here’s the definition:
Azure DevOps is a service collection offered by Microsoft. It helps develop services that allow your development team to plan, communicate, support, develop, and deploy apps.
Here are some services that developers can use with Azure DevOps:
- Pipelines
- Repos
- Boards
- Artifacts
- Test Plans
Understanding CI/CD Pipeline
Azure DevOps is usually known for offering quick and reliable releases, so continuous integration and deployment are essential in DevOps. In Continuous Integration(CI), a team of developers keeps sharing code in a shared repository. The integrated code is built through this shared repository and passed through unit, acceptance, and integration tests.
In Continuous Delivery(CD), you can ship or launch your software quickly. This phase of software development is completed with the help of consistent or Continuous Testing. We utilize automated tests in the CI/CD pipeline, which helps in ensuring the proper flow of change validations.
If you want to explore the process of creating a CI/CD pipeline with Azure DevOps, then read the below stepwise approach.
Benefits of CI/CD Pipeline with Azure DevOps
The Azure DevOps CI/CD pipeline is a process to streamline Continuous Integration and delivery in a software development process. It is possible to start with the existing code or source stage on on-prem containers or GitHub. With the help of Azure Repos, manage a central repository for code integration, and use pipelines to make and deploy pipelines for CI/CD support.
Along with the Azure DevOps Continuous Integration and Deployment, you can utilize these pipelines to make workflows (build-deploy-test), commonly utilized in Continuous Testing. This evaluates and tests modifications in a scalable and quick routine.
Here are some advantages of using CI/CD pipeline with Azure DevOps:
- It improves and speeds up app development and the lifecycle of development.
- CI/CD pipeline allows consistency and quality in the automated release and builds processes.
- You can enhance the uptime and stability of your application with CI/CD pipeline implementation.
- Azure CI/CD pipeline supports most version control systems like BitBucket, GitHub, Subversion, or other repositories for maintaining the code, and also integration can be done with Team Foundation Version Control.
- It is possible to select different programming languages in Azure pipelines. For example, PHP, C, Java, C++, C, Go, Python, and JavaScript.
- Developers can use Azure pipelines to deploy CI/CD pipelines to various target environments. For instance, Containers, Virtual Machines, and On-Prem platforms.
· Azure Pipelines is free if you create a public project, and you get 1800 minutes free every month for private projects.
How Can You Create a CI/CD Pipeline with Azure DevOps?
Creating a CI/CD pipeline with Azure DevOps involves the following process. Check the prerequisites for this before moving on:
- If you don’t have an active Azure account, then you necessarily need one for Azure Pipelines and Repos. Visit this link to make a Microsoft Azure Account.
- Further along, we will also use .Net Core and Visual Studio for the sample app. Download Visual Studio 2019 and .Net Core before starting.
. The web app is already created in the Azure Portal; here’s what you need to do next
-

Follow our tech founder for more valuable tips, tricks, learning, content and future opportunities
Configure Build Pipeline
The build pipeline is the pipeline created to automatically build any application once the code has been changed in the repo. The build pipeline is also known as “Continuous Integration(CI).” To create one, follow the steps below,
a. In Azure, DevOps navigate to your project.
b. Under the project from the left pane, navigate to pipeline.
c. Click on the “Create Pipeline” button on the page. The page would take through a wizard of steps as shown below,
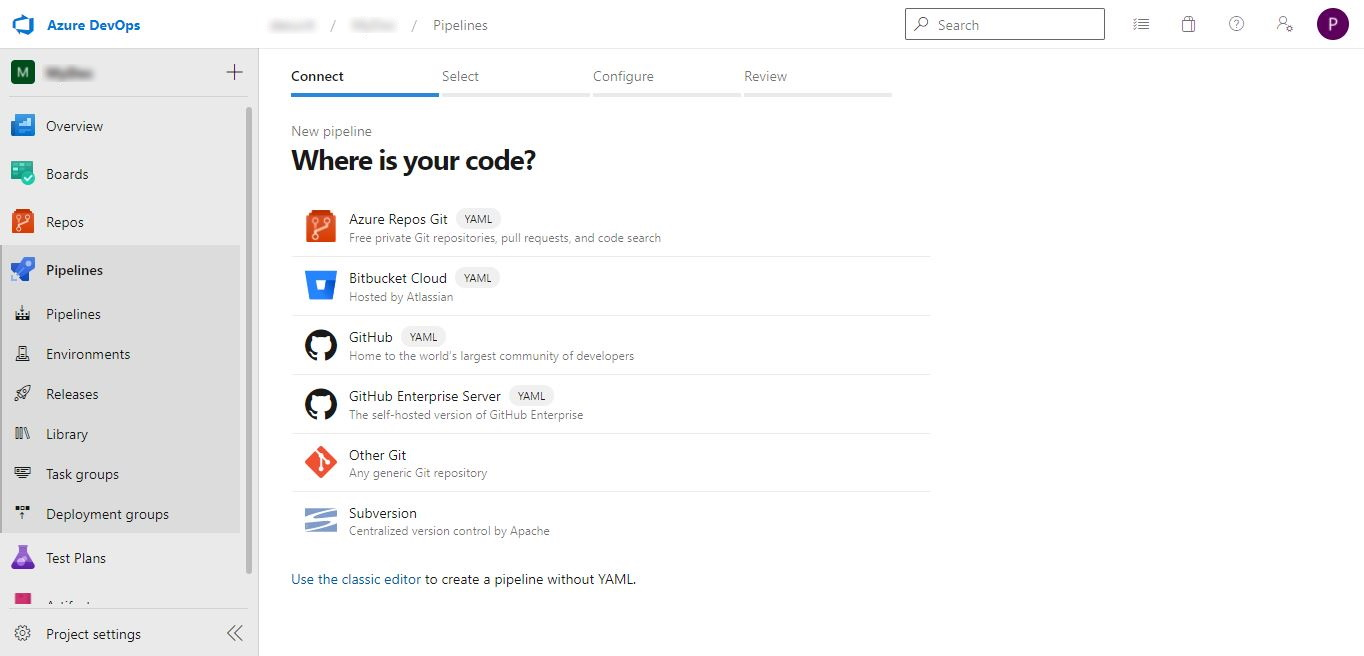
d. You need to connect to the host where your source code resides. Azure DevOps provides seamless integration with various source code repositories like GitHub, Bitbucket, Subversion, and many more. We would go with Azure Repos Git, as this is where we have our .net core project located.
e. If other repositories are selected, you may have to provide the login credentials to access the repo.
f. Once you are connected to the repo, in the next step, select an appropriate code base for which you need to create a build.
g. Azure Pipeline would analyze the selected repository code and suggest the Pipeline template from which you can choose one, or you would also have an option to select an existing YAML file from the selected repo.
h. Edit the YAML file by adding or removing tasks as required.
i. Click on Show assistant, search for the task to perform, fill in the required details and click on add.
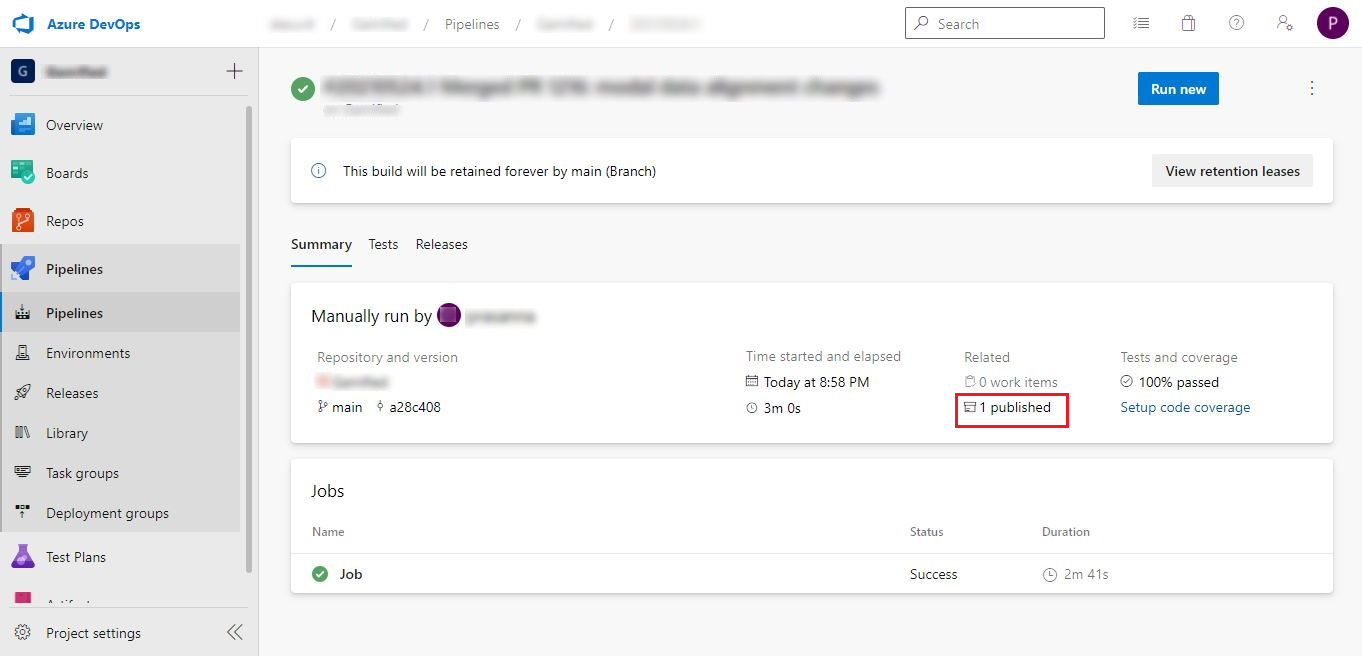
j. After completing the YAML file edit, click the save button and select commit directly to the master branch option to add the YAML file into your branch.
k. After a successful YAML save, the Run button is shown. Click on it to start the build.
l. Wait for the Run to finish, and you should be able to see the Artifact created successfully.
m. For detailed tasks available for build pipeline, refer to Microsoft documentation.
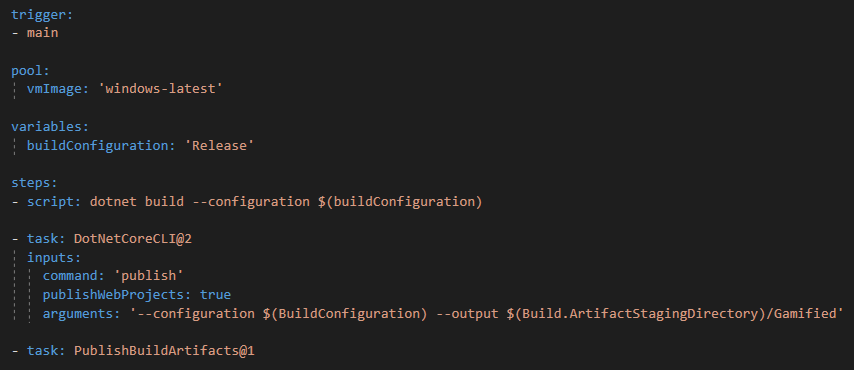
n. Below is how the YAML file would look like for a .Net core project
Configure Service Connection
Service connections enable you to connect to external services to execute any task in a job. This behaves similar to a connection string which is used to connect to a remote database. We require the service connection in the next step(release pipeline).
As mentioned earlier in the prerequisite, follow the below steps to create a service connection to connect to the Web app
- On the left menu, click Project Settings and then click on Service connections under the Pipelines section.
- Click on the New service connection button.
- Select Azure Resource Manager connection type and click on the Next button.
- Select Service principal (automatic) as the Authentication method and go to the next step
- Select Subscription as the Scope level and then select appropriate Subscription, Resource group same as what was given on the Web app. Give a name for Service connection and Save.
- Configure Release Pipeline
We have successfully configured the Build Pipeline and Service connection. However, that’s not the end goal. We need to deploy the application for customer use to explore the configuration of a Release Pipeline(CD) in this section.
a. Go to Azure DevOps and click on Releases.
b. Click the New pipeline button from here. A fresh pipeline will be launched in the wizard, as shown below.
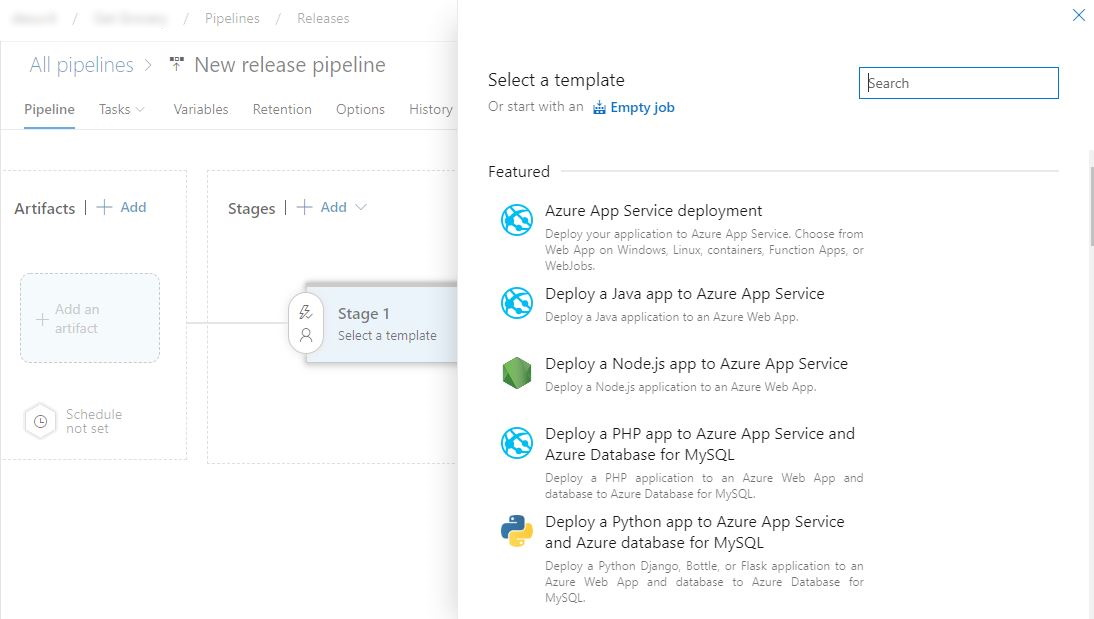
c. Look on the right and find the Azure App Service Deployment. Here, you will find different templates for the release pipeline. These templates can save your time. From the list, you need to choose the Azure App Service template.
d. You need to provide a Stage Name in this step. This Stage has your release tasks.
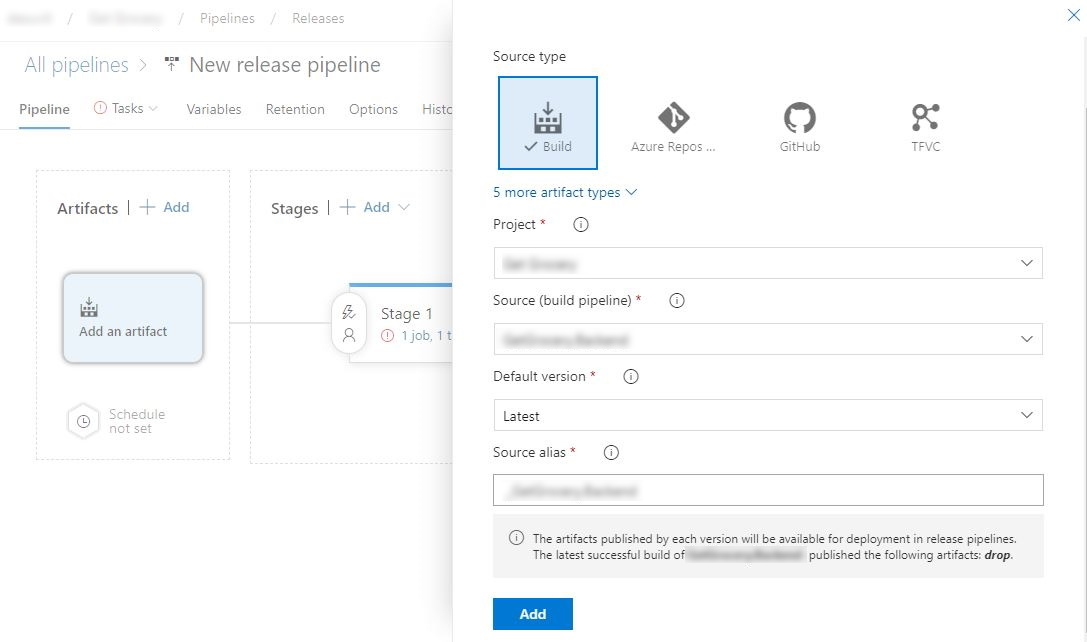
e. Click on the Add an artifact box. Select Source type as build, appropriate project from the dropdown and the Source. SoThe source could be set to the build name we have created in the Configure Build Pipeline section. Finally, click on the Add button.
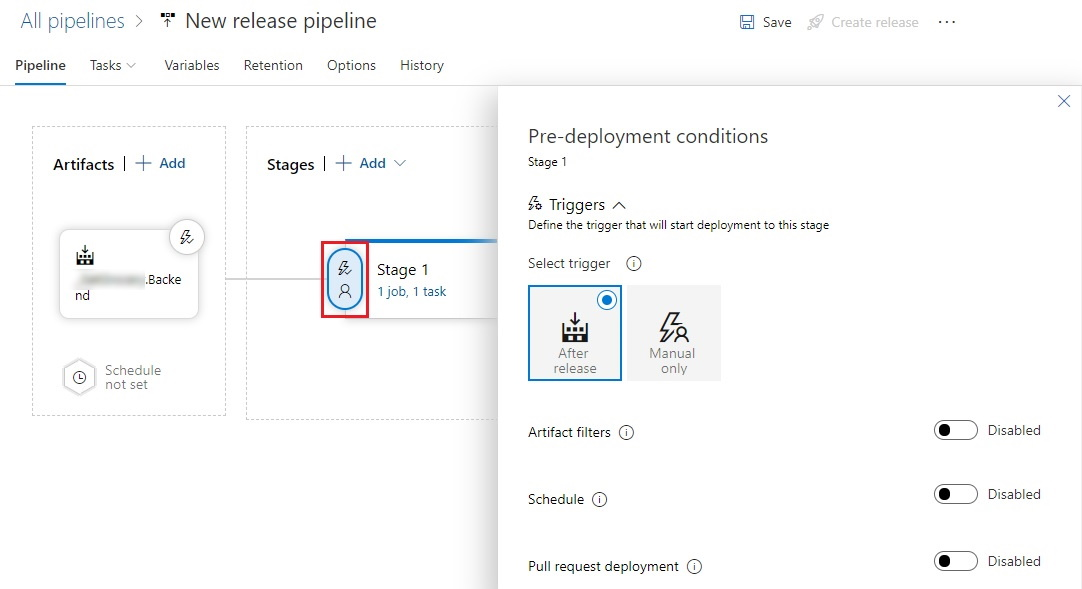
f. Once the Artifact is added successfully; you would get an option for configuring the deployment trigger in the Artifact box. The deployment trigger is what decides when the deployment should happen. We are going to set this trigger for deploying whenever a new build is available. Add a branch master as shown below.
Refer to the Microsoft documentation for other available deployment triggers.
g. Now click on the task under Stages. Set the value of Azure subscription to service connection created in the above section, set the value of App type to Web app on Windows, and App service name would be auto-populated with the values based on the service connection.
h. Click on the Run on agent and make sure Artifact download is set to the Artifact created in the above step. Keep all other settings as default.
i. Click on the Deploy Azure App Service and make sure the Package or folder path is set properly. This is the path to the folder containing the app service content to be deployed.
j. Choose pre-deployment conditions: After-Release or Manual. The After-Release is deploying when a new release is available, and Manual is for deploying manually
k. It is also possible to set up approvals for pre-deployment. You have options to use one approver, a group of approvers, or a user.
l. Finally, click on the Save button.
Conclusion
When you start utilizing the CI/CD pipeline for your organization, you can create state-of-the-art applications and software. Explore the benefits of CI/CD in automating deployments and improving your productivity. Check the above process, and establish a CI/CD pipeline with Azure DevOps.
If you need assistance in this activity, you can always reach out to Desuvit Technologies for software development services. Our team is equipped to handle your software development request; Connect with us to discuss further.
Desuvit is a Norway-born software development company delivering Custom Software Development, Mobile Apps, and Web Applications Development for various verticals and business domains. We offer end-to-end solutions for companies with no software or IT division, Startups, and companies that need to scale their software development efforts but lack the expertise required. We help our clients in growing their businesses so we can grow with them. Some of the technologies we work with: .Net, Azure, Microservices, Azure functions(Serverless computing), React Native, Flutter, React JS, TypeScript, Angular, NServiceBus, Azure Service Bus, Azure Queues, SQL Service, MySQL, Cosmos DB, etc.
Enjoyed this article? Subscribe for more valuable and great content !
By subscribing, you agree with our privacy policy and our terms of service.