State management in Flutter is a crucial and challenging topic, which can be very difficult to understand at once. This comprehensive guide will help you make sense of different concepts of state management, including what is a state, why it is important, ephemeral and app state, and other state management methods.
Let’s start by exploring what is a state:
The state is the synchronous information about a widget that is created when you build a widget. This state changes throughout the widget’s lifetime.
With the help of widgets, app functions send and share data, and many other operations are carried through this widget. So, when you redesign your UI with the help of data, that moment is the state of the widget.
Let’s understand this with an example:
Suppose we are working on a questionnaire app, and in this app, the following state occurs:
- When the user first registers, the pages inside the app update according to user preferences selected during registration.
- Once the user enters the app, they get a relevant questionnaire inside the app.
- After the user selects one questionnaire, the data related to this test is updated, such as wrong answers, time taken, etc.
- Once the user has completed the paper, they receive the scores and ranking.
In all these states, the UI updates with the help of new data.
-

Follow our tech founder for more valuable tips, tricks, learning, content and future opportunities
Why State Management Is Required?
State management is essential in Flutter app development because it allows us to centralize every UI state and control data flow in the application.
For instance, you want to send a welcome message to the user when they have just joined, but you don’t want to keep showing this message for two years in a row or till the time the user keeps using this app. For this, if we explain every page how to handle the state, we may experience code challenges. It will also result in code duplication.
To just show this message when the user registers is a part of state management and UI control.
Here are the issues solved by state management:
- How can we handle a page after the user hits the refresh button on the URL?
- What can we do once the data on the server refreshes or updates?
- How do services and components know about the state?
- How do we request the server for a page update?
State management is the process that helps us know about our application, where the user is in the app, what they are doing, what data they are inputting, etc.
More About Flutter State Management
We can categorize state management in the following conceptual types:
Ephemeral
A state that you can neatly and easily sustain in one widget. While this is a vague explanation, here’s more clarification:
- The progress achieved by a complex animation
- The bar selected in a BottomNavigationBar
We don’t need to serialize the ephemeral state, and we don’t have to use any type of technique for state management (Redux, ScopedModel, etc.).
A well-known example of an ephemeral state is any text field. For example, in the below example, “_counter” is our state. The setState() function defined in the stateful widget has the power to access this state. The setState() is the method that helps modify the state variables. When we execute setState(), the object in the widget is changed, which is how we get a changed variable value shown on the UI.
class Counter extends StatefulWidget {
@override
_CounterState createState() => _CounterState();
}

class _CounterState extends State<Counter> {
  int _counter = 0;

  void _increment() {
    setState(() {
      _counter++;
    });
  }

  @override
  Widget build(BuildContext context) {
    return Row(
      children: <Widget>[
        RaisedButton(
          onPressed: _increment,
          child: Text('Increment'),
        ),
        Text('Count: $_counter'),
      ],
    );
  }
}
App State
App state is a type of state that can be shared across different widgets of your app and is present across complete user sessions. For example, app state appears in the form of login info, user preferences, social app notifications, e-commerce app shopping cart, articles state (read/unread) in a news app, etc.
If you look at it, then there is no one rule here to use ephemeral or App state. One can change one state to another based on the requirement. You have the power to use both setState() and App State to handle every state of your app. In reality, you may have observed the Flutter team implement this multiple ways in its app samples.
However, this is true in the other sense too. For instance, you can decide that the bottom navigation under a selected tab doesn’t fall in the ephemeral state category and this can be managed under the App state. Then, it is your responsibility to change state in between sessions, from outside of the given class, and so on. If we consider this case, we can keep a variable _index in the app state and this can be accessed as needed.
Therefore, we don’t have one or many rules to define which is the app or ephemeral state. But, we can know when a certain variable is in the app or ephemeral state.
Why Use setState()
Why are we using setState() for state management above?
Pros
- setState() is an easy statement method.
- It helps you manage your ephemeral state without any hassle which works out of the box, where the widget using the state variable is automatically notified of change in the value.
Cons
- When you are handling a global state which is across the App, setState() is not the right type.
- If you end up using setState() across the entire app, you may face a maintenance glitch, as your state will be everywhere.
- You have to use setState() in the UI code’s class only. This means you can end up mixing business logic and UI, which hampers code quality.
Types Of State Management Based On Concept
Your Flutter app enters either the shared or local state at some point. Let’s explore what these states are:
Local State
The local state is nothing but the ephemeral state. When you are modifying the single state of a page that has UI animations or controls, you are dealing with the local state and we can use a stateful widget for this purpose.
Shared State
When you have to modify the state of more than one widget, then we use a shared state in the app. This state management is called nothing but app state only.
List Of State Management Based On Its Popularity
1. Provider
If you are just starting to use Flutter, then you have a strong reason to use Provider. It is easy and you don’t need to code that much. Further, you will end up using concepts that are relevant to other approaches as well.
Let’s understand Provider with an example:
We are creating an app with two screens. Now, depending upon the concept of your app, these can be anything, such as a cart and a catalog, or a post wall and friends, etc. If we use it as a shopping app, then you may have a catalog as the main screen and a cart where users put selected products.
The catalog page has a custom search bar along with a scrolling ability.
If you create a widget tree of the above scenario, below is how it might look like,
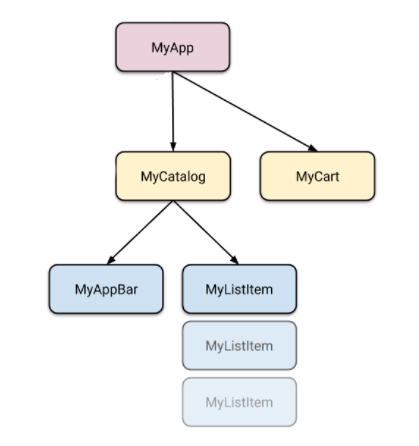
Many of these subclasses require access from somewhere else. For instance, the myListItem from the catalog should be able to be added to the cart list. This subclass would also need to see if the item is already on the list of the cart.
Lifting the State
It is common to think that you should place your state on top of your widgets. However, in Flutter, when you need to modify the UI, it is rebuilt. Therefore, it is comparatively difficult to modify the widget by calling its method from outside of it and updating the UI.
Since Flutter rebuilds the UI when we change the content of it(through the build method), we should use a constructor to pass the new content. This content is then used in the build method and the UI would rebuild every time the new content is passed in the constructor.
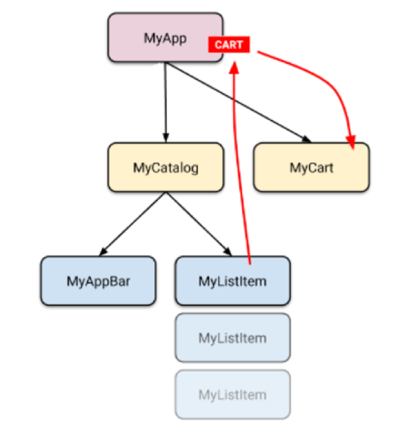
The ideal place for this state would be to place it inside the myApp which is the top level widget. After lifting the state up, now the widget tree might look like as below,
Accessing This State
What will happen if the user hits the catalog add item?
It should be added to our cart. Simple, right? But the myListItems in the above visualization are below the cart.
We can achieve this by arranging a callback inside the MyCatalog widget, which allows MyListItem to be invoked once someone clicks this item. But, this might become unmanageable down the line as you may need to arrange so many callbacks. Therefore, we will use the Provider state management approach for this,
The Provider state management works on the following concepts:
ChangeNotifier
In the Flutter SDK, this class helps us inform listeners of the change. Simply put, it is a class to be implemented for informing of any change in the state. You can use one of the many ChangeNotifiers in your app depending on the simple or complex functionality of the app. The sample code of the ChangeNotifier might look as below which is holding the state variable _Items.
class CartModel extends ChangeNotifier {
  /// Internal, private state of the cart.
  final List<Item> _items = [];


  /// Adds [item] to cart. This is the only place in the App where state of the cart can be updated
  void add(Item item) {
    _items.add(item);
    // This call tells the widgets that are listening to this model to rebuild.
    notifyListeners();
  }

  /// Removes all items from the cart.
  void removeAll() {
    _items.clear();
    // This call tells the widgets that are listening to this model to rebuild.
    notifyListeners();
  }
}
ChangeNotifierProvider
ChangeNotifierProviders is a widget which helps send the ChangeNotifier instance to the descendants. Using this, we can inform the MyListItem when the state is changed. The ideal place to create a ChangeNotifierProviders is the parent widget. The sample of the code might look as below,
void main() {
  runApp(
    ChangeNotifierProvider(
      create: (context) => CartModel(),
      child: const MyApp(),
    ),
  );
}
In the above code sample the ChangeNotifier instance is created and the instance would be available to all the consumers.
Consumer
We can start using ChangeNotifierProvider with the help of the Consumer widget(child widgets). In the Consumer, you have to define the model that you are willing to access. The sample code of the Consumer might look as below,
return TopWidget(
  // ...
  child: ChildWidget1(
    // ...
    child: Consumer<CartModel>(
      builder: (context, cart, child) {
        return Text('Total price: ${cart.totalPrice}');
      },
    ),
  ),
);
Provider.of
There are use cases when we don’t want to change the state based on the data. For instance, when the cart is cleared. Here, the widget only needs to clear the cart without calling any content. In this case, we use Provider.of, which sets the listen to parameter to false as shown below,
Provider.of<CartModel>(context, listen: false).removeAll();
The Provider package is very convenient and easy to use whenever services and data are provided for the descendants in the widget tree.
2. setState
If you have ever used React, then you would find setState() much similar to useState. Similar to how useState works in React, setState() is only used in Flutter to handle the relevant state of the widget where it has been declared. This type of management is commonly referred to as an ephemeral state, which can be controlled and defined with the help of StatefulWidget and setState().
To understand this, let’s consider this example:
When you need to change an app so that it can react to the input offered by the user, what would you do? For this, we will include interactivity in an app that is created using only non-interactive widgets. We will particularly create a stateful widget to handle two other stateless widgets.
Usually, the first thing that we decide is how the state of a widget will be managed. In this case, the widget itself will manage the state.
3. InheritedWidget and InheritedModel
InheritedWidget state management is actually a base class that passes the relevant data to the children in the tree. It is a top to a bottom architecture where anyone below this widget will automatically inherit the properties of the created widget. However, when your app size is huge, this structure is complicated.
InheritedModel is a different widget that empowers developers to define the sections and data that they need to rebuild in the descendants. Therefore, the dependents of inherited widgets are not rebuilt without any condition.
Providers and many other approaches use this under the hood.
4. Redux
Redux is a state management architecture built on a unidirectional flow of data following the separation of concerns, which means presentation and business logic. Since Redux separates various app parts, changes in the UI are much more simpler, and debugging is not a hassle. From synchronous app logic, this is the best state management.
5. Fish-Redux
Fish-redux is based on Redux only. It is an open-source high-level framework for Flutter applications. The state management framework allows configurable assembly and improves isolating and reusing features of Redux. It is currently being used in the Xianyu platform of Alibaba.
6. BLoC
The business logic component(BLoC) is a state management technique that helps developers extract data from a central place in the project. This is one of the most utilized Flutter state management techniques, as it is recommended by developers at Google.
In this state management technique, everything is in event streams that help manage different states of the widget.
7. Getlt
We can use GetIt in place of Provider and InheritedWidget to access objects. It is not really a technique for state management but a service to locate your objects. These service locators help us dissociate the main implementation and our interface, allowing access from everywhere.
You don’t have to make a widget to use data like Redux or Provider, which is also why it is fast and easy to use.
8. MobX
MobX state management believes that if you can get something from the state of the applications, then it should be used automatically. This is a unidirectional data flow model that allows developers to take care of the app state from outside the UI. This type of architecture is easy, as it helps you detect all changes reactively and then provide these changes to the UI.
The framework finds out what is being consumed which is called observables. The reaction rebuilds our widget when there is a change in observables. It is amazing to note that reactions are equipped to automatically find out observable changes without generating external connections.
9. Flutter Commands
Flutter Commands is another valuable method to manage state with ValueNotifiers, which is a special class type that helps us use ChangeNotifier. This ChangeNotifiers contains a notifyListeners() to inform of the state change. ValueNotifier has the capability to hold just one value. However, it doesn’t recreate the whole widget tree on calling setState(). It is better at taking care of informing widgets of the state change.
10. Binder
Binder state management isolates the state of the app from the business logic. You are able to observe the entire app as many tiny states, all of which are independent of each other.
11. GetX
GetX is an extremely powerful technique for state management. It uses state management, route management, intelligent dependency injection, and navigation in a quick and practical manner. You can completely dissociate the presentation logic, view, business logic, and dependency injections.
You get a range of features and APIs to make development hassle-free. Further, due to the use of the dependency injection feature, you don’t need to use a widget tree, route, or context.
12. Riverpod
Riverpod is a state management technique very similar to Provider. Unlike Provider, it helps overcome challenges, such as readability, testability, performance, etc. through a unidirectional flow of data. It detects errors at the time of compilations only, which saves developers from dealing with exceptions at runtime. Additionally, Riverpod avoids BuildContext dependency.
13. states_rebuilder
states_rebuilder uses an integrated router with a dependency injection solution to offer quick development and seamless state management. It separates the business logic from the UI and helps you eliminate boilerplate.
14. Triple Pattern
The triple pattern is a state management technique that utilizes ValueNotifier and Streams. The reason why it is known as triple is that it uses values, including Loading, Error, and State according to Segmented State Pattern.
Which Is The Best State Management?
There is no one way of knowing which state management technique you can use. This choice depends on the complexity of your application and the ability of your developers. Every technique discussed above has some pros and cons, you have to select the right technique for your Flutter development based on your needs.
If you are just beginning to use Flutter, then it is best to start with the Provider or setState() state management technique for ease and feasibility.
Conclusion
In the above article, we have discussed every factor necessary for Flutter state management. From types of states to state management techniques, you can extract a lot of information from here.
If you need help designing a Flutter app, Desuvit Technologies is a leading web and mobile app development company. We are equipped to handle different state managements in Flutter and offer you a robust, fully-functioning app. Know more about our services on our website.
Desuvit is a Norway-born software development company delivering Custom Software Development, Mobile Apps, and Web Applications Development for various verticals and business domains. We offer end-to-end solutions for companies with no software or IT division, Startups, and companies that need to scale their software development efforts but lack the expertise required. We help our clients in growing their businesses so we can grow with them. Some of the technologies we work with: .Net, Azure, Microservices, Azure functions(Serverless computing), React Native, Flutter, React JS, TypeScript, Angular, NServiceBus, Azure Service Bus, Azure Queues, SQL Service, MySQL, Cosmos DB, etc.
Enjoyed this article? Subscribe for more valuable and great content !
By subscribing, you agree with our privacy policy and our terms of service.