The Internet is said to be a place where whatever you wish to learn is already available for you, you just have to know how to search for it. However, that’s not always true. Though there are more than 44 zet bytes of data on the web we still stumble upon countless topics for which the information is not detailed enough or not in a required sequence or not complete. This article is an attempt to become a peeled Banana for those who wish for…
“I wish there is a single Blog which explains how one implements Push Notification using Firebase for an ios App”.
Implementing Push Notification was a nightmare as we had a tough time finding all required information in one place which is the reason for the birth of this blog article. Believe this article makes implementing the push notification as easy as a cakewalk.
To whom this blog article is for?
If you are looking out for implementing a push notification on IOS using Google firebase messaging, you landed in the right place.
Prerequisite:
- 1. At least some hands-on experience working on react native, xcode, and handling the certificates on the apple developer account.
- 2. ReactNative version must be greater than or equal to “react-native”:”0.63.2”
- 3. The app bundle is already registered on the Apple store and a required identifier certificate is created. Ensure that the push notification feature is enabled.
Just a little theory on push notifications
Push notifications are messages or alerts sent by the makers of an application the user has installed.
Below is the high-level pictorial representation of push notification implementation on iOS.
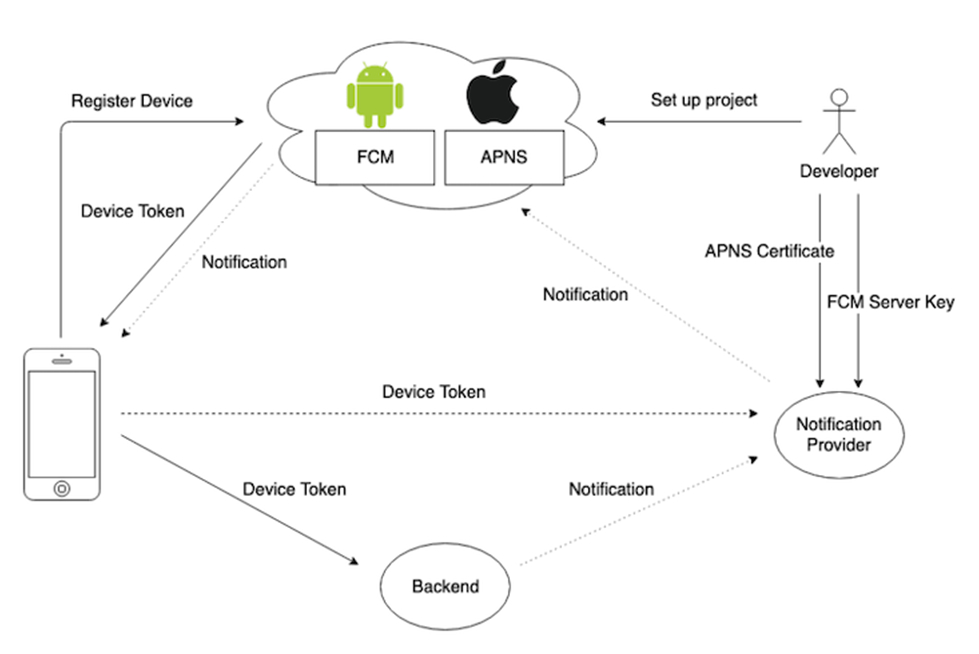
Image source: LogRocket
Push notifications are popular in the world of mobile app development for a number of reasons, including:
- They enable firms to advertise products and offers at a reduced cost
- They improve overall user experience
- They aid in the sending of transaction receipts faster
- They are used as a way to keep users engaged with our App
-

Follow our tech founder for more valuable tips, tricks, learning, content and future opportunities
Enough is the introduction, let’s get into real action.
Are you ready to code with me? Let’s start and below are the steps we need to follow,
- Firebase basic configuration
- Create an APN certificate on Apple developer account and mapping it on the Firebase project.
- Code changes on the project level for adding push notifications
- Testing
Step1: Firebase basic configuration
1. If you do not already have an account you can create one and then login to
https://console.firebase.google.com
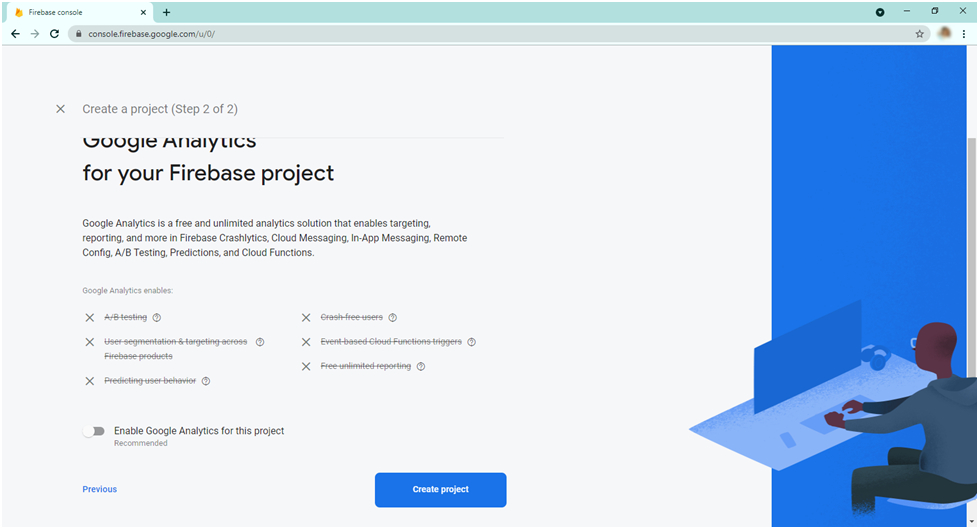
2. Create a new project by following the below steps,
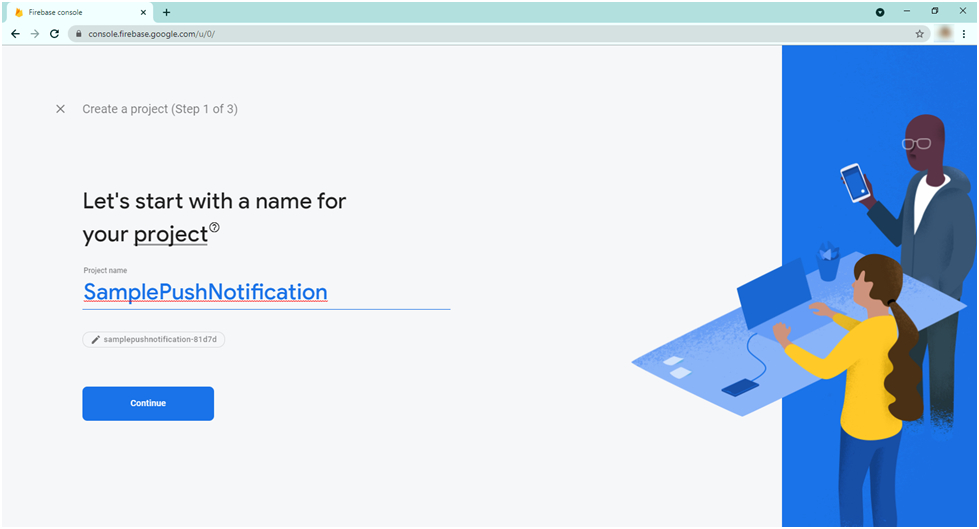
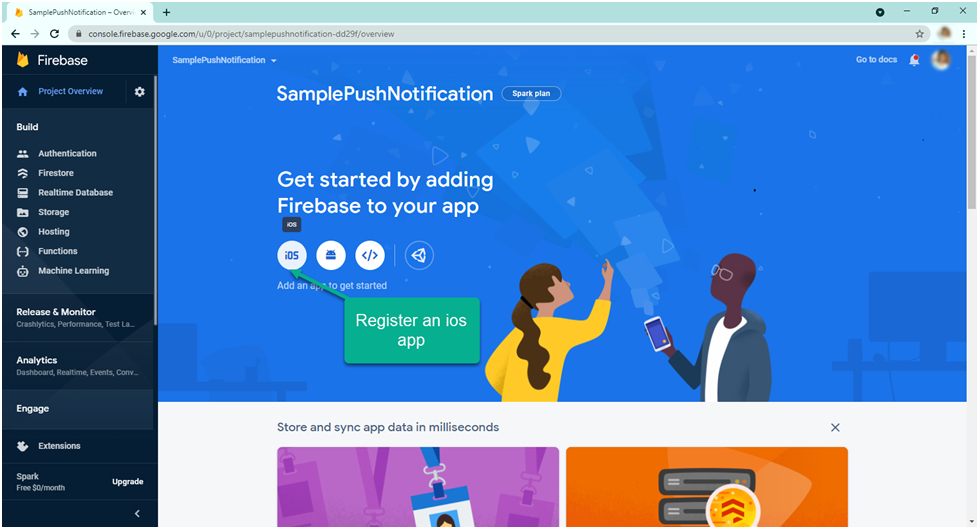
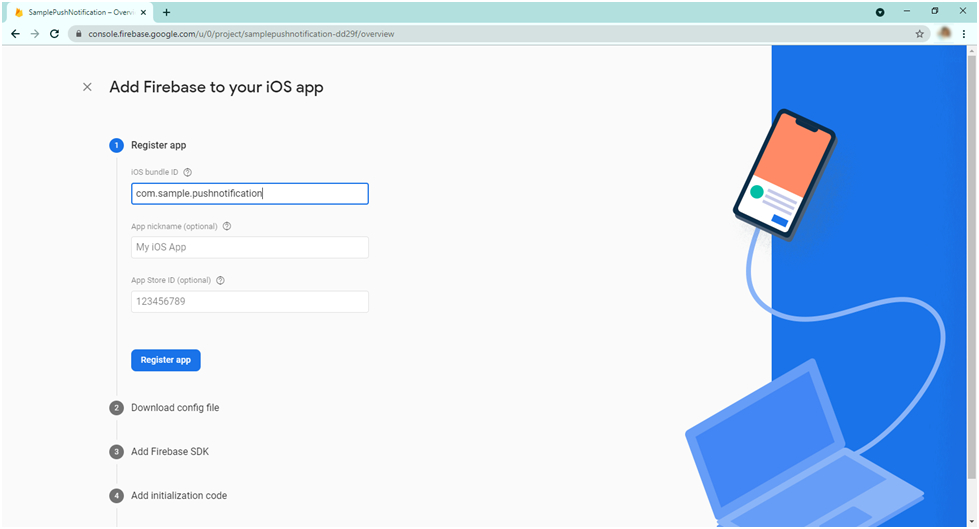
3. Add the iOS APP with the following steps,
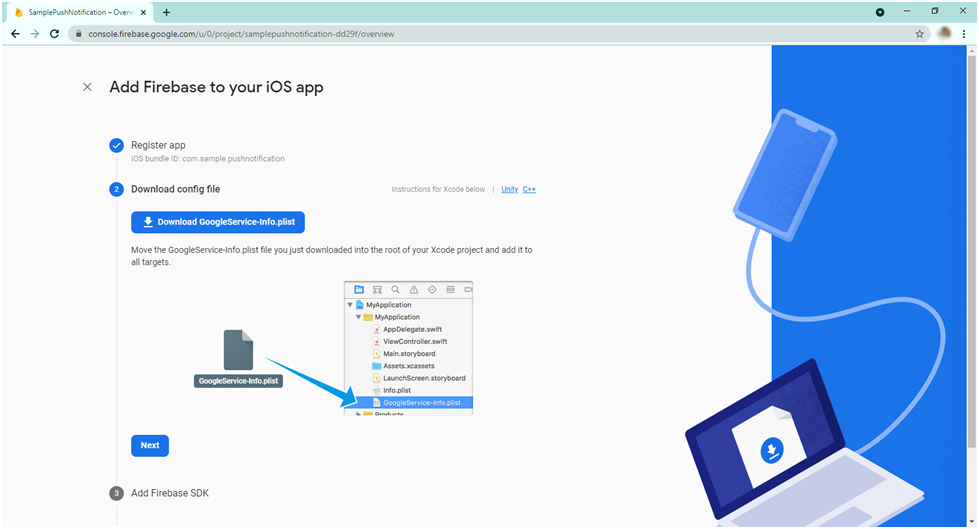
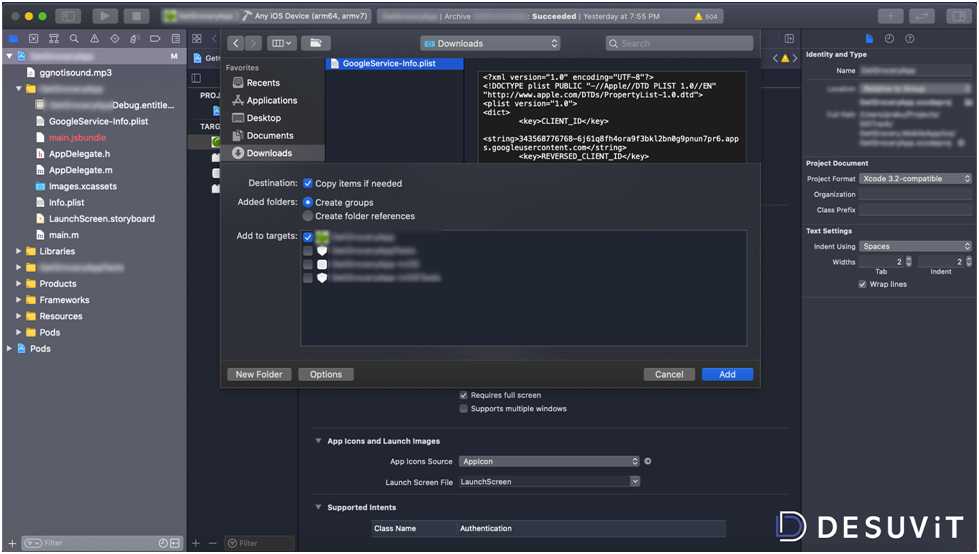
4. Download the “GoogleService-Info.plist” file and this needs to be added to your project in the next step. Finish the wizard by clicking the next button(you can discard the other steps 😉 ).
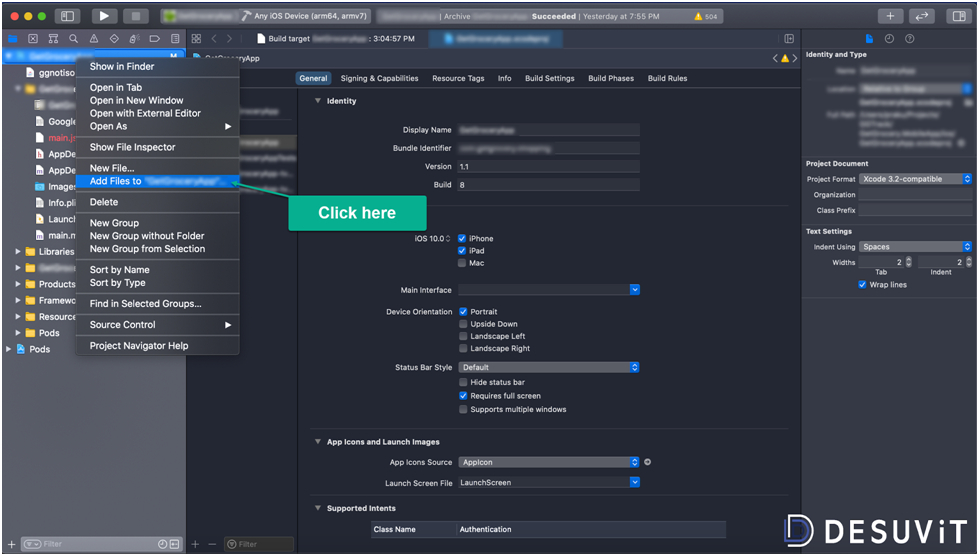
5. Open your iOS project in xcode and add the “Google Service-Info.list” file into your root folder(PROJECTNAME/ios) of your project from xcode by right-clicking on the project as shown below,
Step 2: Create an APN certificate on Apple developer account and mapping it on Firebase project
In this section you need to follow the steps in the link https://rnfirebase.io/messaging/usage/ios-setup to generate the APN key on the Apple developer account and then link the .p8 certificate to the firebase iOS project we have created in the above section. Make sure the below points have been achieved before proceeding further to the next section.
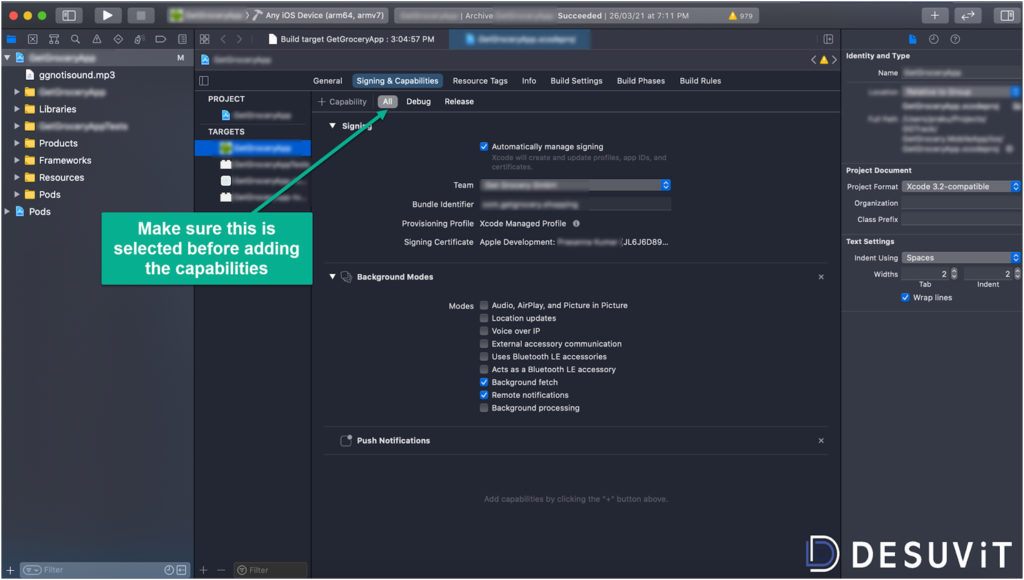
1. Adding the capabilities “Background Modes” & “Push Notifications” for the project in xcode.
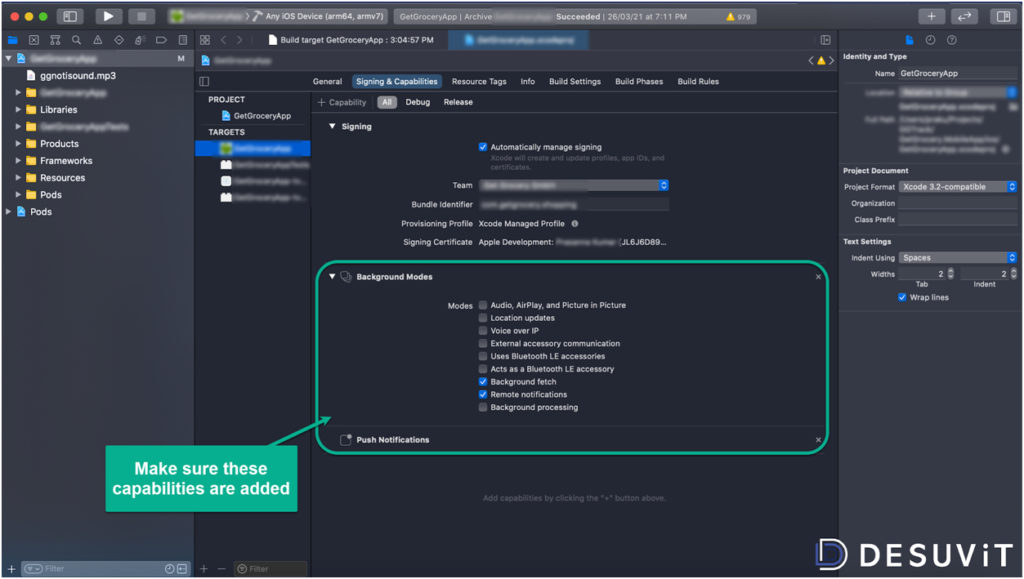
Important: while adding the capabilities, make sure you select “All” as shown below.
2. Register a key in the Apple developer account with “Apple Push Notification Service (APNs)” enabled.
3. Upload the above key file(.p8) in the firebase iOS project under APN authentication key section in firebase.
4. Under the identifier, enabling the push notification service.
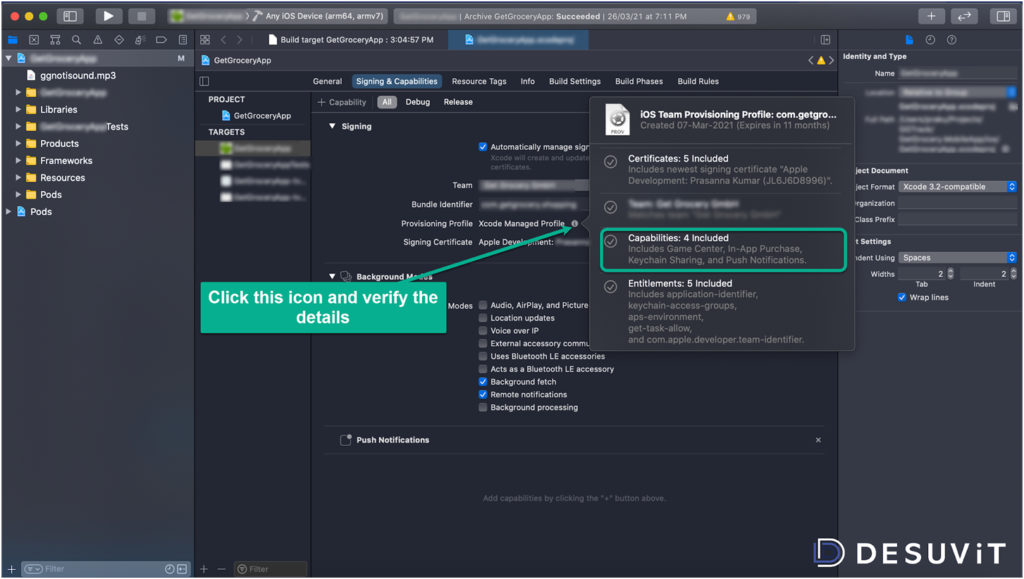
5. If you already have the distribution certificate and developer certificate, you don’t have to worry about provisioning the certificate. Below is what you should cross verify in the xcode,
Step 3: Code changes on the project level for adding push notifications
We are now almost done. Here are code changes which need to be done in the project for push notifications to work.
1. Add the below packages from the terminal
Yarn add @react-native-firebase/app
Yarn add @react-native-firebase/messaging
yarn add @react-native-community/push-notification-ios
yarn add react-native-push-notification
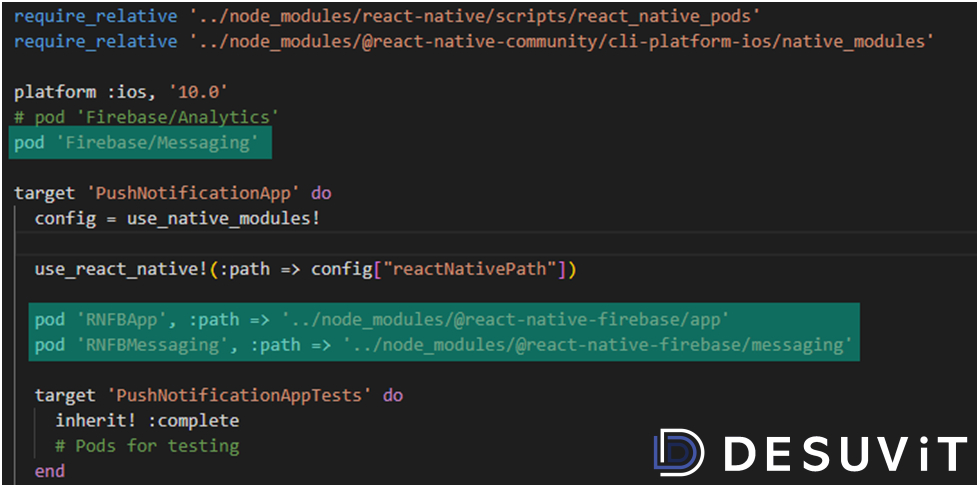
2. Add the highlighted lines of code in pod file as shown below,
3. Run the command “pod install” from the terminal by navigating into the ios folder of the project.
4. Make the changes related to “AppDelegate.h” and “AppDelegate.m” as per the link https://github.com/react-native-push-notification-ios/push-notification-ios. These changes are part of the package “@react-native-community/push-notification-ios”
5. Make the changes related to ““AppDelegate.m” as per the link https://github.com/zo0r/react-native-push-notification . These changes are part of the package “react-native-push-notification”
6. Add the below line of code in “AppDelegate.m” file,
#import <Firebase.h>
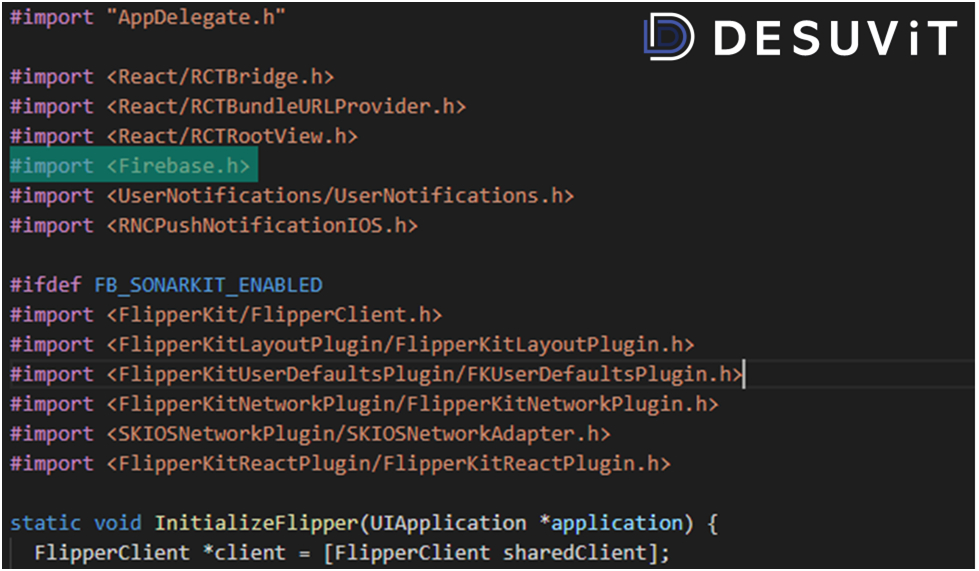
Note: Make sure you add the import statements on “AppDelegate.m” file above the import of “#ifdef” as shown below.
7. Add the below line of code in the “AppDelegate.m” file’s “didFinishLaunchingWithOptions” method.
[FIRApp configure];
Important: add this as the very first line.
8. Import the below packages in the App.js file located in the root of the project.
import messaging from ‘@react-native-firebase/messaging’;
import PushNotification from “react-native-push-notification”;
import PushNotificationIOS from ‘@react-native-community/push-notification-ios’;
9. Add the below two methods in the App.js file located in the root of the project.
async requestUserPermission() {
    await messaging().requestPermission();
  }

  async getToken() {
    const fcmToken = await firebase.messaging().getToken();
    if (fcmToken) {
        // user has a device token set it into store
        await AsyncStorage.setItem('fcmToken',fcmToken);
      }
      else{
        NotificationService.error(constant.error, 'Could not get the FCM token');
      }
  }
10. Add the below lines of code in “componentDidMount” method
this.getToken();

    PushNotification.configure({
      // (optional) Called when Token is generated (iOS and Android)
      onRegister: function (token) {
        messaging().subscribeToTopic("all");
        console.log("TOKEN:", token);
      },

      // (required) Called when a remote is received or opened, or local notification is opened
      onNotification: function (notification) {
        console.log("NOTIFICATION:", notification);
        //This condition is for identifying the local notification and remote notification.
        //If this condition is not present, it would go into infinit loop
        // Consider only the remote notification
        if(notification.title != undefined && notification .message != undefined)
          PushNotification.localNotification(notification);

	notification.finish(PushNotificationIOS.FetchResult.NoData);
      },

      // (optional) Called when Registered Action is pressed and invokeApp is false, if true onNotification will be called (Android)
      onAction: function (notification) {
        console.log("ACTION:", notification.action);
        console.log("NOTIFICATION:", notification);

        // process the action
      },

      // (optional) Called when the user fails to register for remote notifications. Typically occurs when APNS is having issues, or the device is a simulator. (iOS)
      onRegistrationError: function (err) {
        NotificationService.error(constant.error, err.message);
      },
      senderID: 'XXXXXXXXXXX',
      // IOS ONLY (optional): default: all - Permissions to register.
      permissions: {
        alert: true,
        badge: true,
        sound: true,
      },

      // Should the initial notification be popped automatically
      // default: true

      popInitialNotification: true,

      /**
       * (optional) default: true
       * - Specified if permissions (ios) and token (android and ios) will requested or not,
       * - if not, you must call PushNotificationsHandler.requestPermissions() later
       * - if you are not using remote notification or do not have Firebase installed, use this:
       *     requestPermissions: Platform.OS === 'ios'
       */
      requestPermissions: true,
    });

    this.requestUserPermission();

    messaging().setBackgroundMessageHandler(async remoteMessage => {
      //This handler is called when notification is delivered in the background.
      //Handle the background notification here
      console.log('Message handled in the background!', remoteMessage);
    });
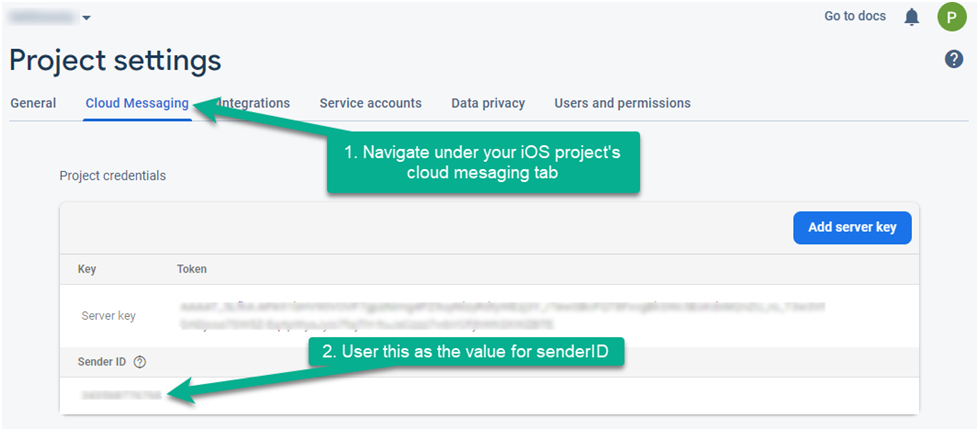
Note: In the above code, replace the senderID value “XXXXXXXXXXX” with actual “senderID”. You can get this from Google firebase console, as shown below,
In the above code, you need to understand few things,
1. PushNotification.configure is the method which is used to configure the settings on initial loading of the APP.
2. “onRegister” is the event that gets called upon the device’s successful registration to the firebase messaging service. This is the place where we have to subscribe to any topics of the firebase messaging. Topics are the one’s which we can use, when we want to send notifications to multiple devices. For instance, if you want to send an advertisement to all devices where your App is installed, the topic is what you need to use. If you are curious to know more about topics, do refer this link https://firebase.google.com/docs/cloud-messaging/android/topic-messaging
3. “onNotification” is the event that gets called when the device receives the notification from Firebase. There are different states in which the App goes through,
- a. App foreground – When the App is open and active
- b. App background – When the App is closed but open in the background and is idle.
- c. Quit – When the App is completely closed and cleared from recent apps as well.
If the App is in background mode or quit mode, we don’t have to worry much. Showing the notification is taken care of by the packages. However, if the App is in foreground mode(App is open and active) then we have to show the notification explicitly which is done in the “onNotification” event. The “if” condition is very important here. If it is missed, you would go infinite.
4. Other events are self explanatory. You can go through the comments to understand.
5. Finally at the end of “componentDidMount”, we are calling the function which gets the required permission for showing the notification.
6. We also called the “getToken” method in “componentDidMount”. The reason being that, on iOS, the FCM token which we receive in the “onRegister” doesn’t work. The “firebase.messaging().getToken” method returns a token which is called FCM token. FCM token is used to send notification to a single device. In the next section, we will explain how you can send the notification targeting multiple devices(using topics) or a single device(using FCM token)
Step 4: Testing
There are many ways to test the push notification. One of the common ways is using the rest API provided by Google firebase. In real time, most of the cases we might have to send the notification programmatically on a certain trigger and the easiest way is to use the rest API, where we can pass the required information of the notification through the body as simple JSON.
However, we can also use other methods like Firebase console or admin SDK too, which you can get more details here.https://rnfirebase.io/messaging/notifications
We shall use the POSTMAN to test our implementation (if you have not used no worries, you can use the firebase console). Below is how you can send a push notification from POSTMAN
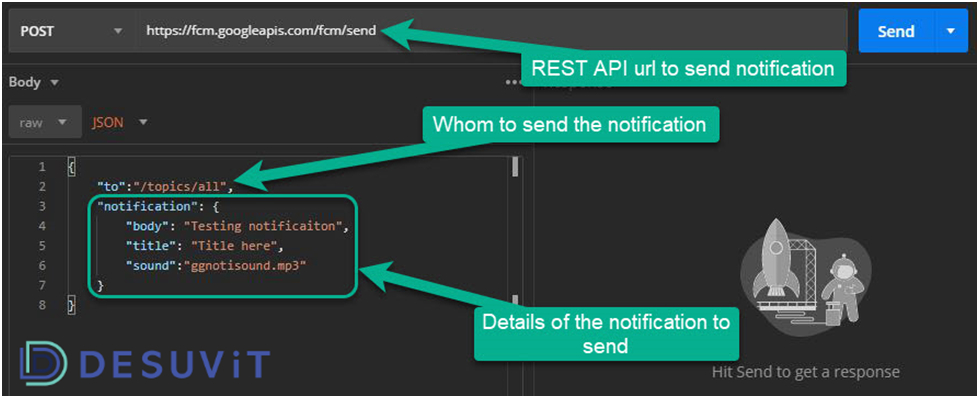
Note: We have used “to” as a topic, where during registration(refer to the register event in App.js), we have subscribed to “all” topic(all is the name of the topic here) and when we send the notification to the topic, the notification would be sent to all devices registered to that topic.
If you want to send the notification to a particular device, then instead of the topic, we can use the FCMToken.
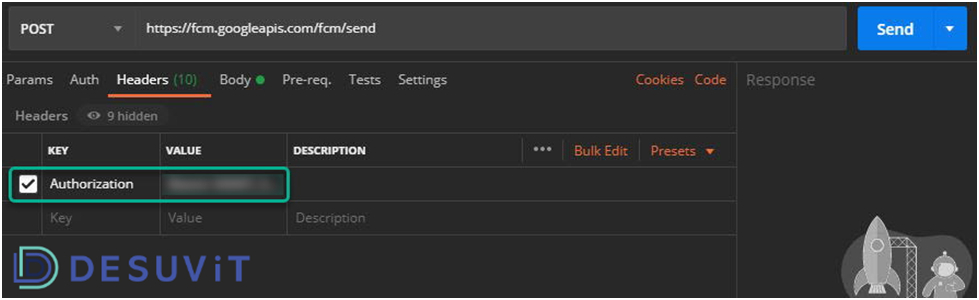
To use the REST API, you also need to have the authorization key which needs to be sent as a bearer token through the header as shown below,
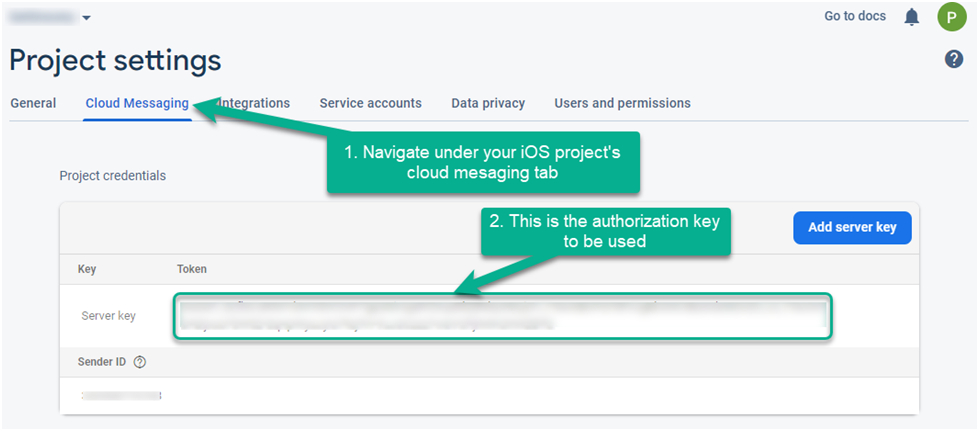
Wondering where to get the authorization key. Don’t worry, below is how you can get it from Google Firebase console as shown below,
Desuvit is a Norway-born software development company delivering Custom Software Development, Mobile Apps, and Web Applications Development for various verticals and business domains. We offer end-to-end solutions for companies with no software or IT division, Startups, and companies that need to scale their software development efforts but lack the expertise required. We help our clients in growing their businesses so we can grow with them. Some of the technologies we work with: .Net, Azure, Microservices, Azure functions(Serverless computing), React Native, Flutter, React JS, TypeScript, Angular, NServiceBus, Azure Service Bus, Azure Queues, SQL Service, MySQL, Cosmos DB, etc.
Enjoyed this article? Subscribe for more valuable and great content !
By subscribing, you agree with our privacy policy and our terms of service.