
When you have a web app idea for international users, a multilingual setup is a crucial consideration during development. Therefore, while designing an application for users spread across the globe, the first thing to consider is how you will achieve language translations.
Multilingual setup in a web app with React JS includes changing text, data, time, and currency to a different language.
In this guide, we have discussed details of the multilingual setup in React JS in detail.
What Is A Multilingual App?
Before we start exploring the implementation of multilingual support in an app, let’s explore its meaning and importance,
A multilingual app offers the ability to switch from one content language to another within an app or a website. We can employ different ways to change the language of an app,
- At the time of registration, the user can be asked for the preferred language.
- A default language can be set and the user may be allowed to change it in the header navigation of the page.
- A default language can be set while registration and the user can change it from user preferences, profile, or settings.
-

Follow our tech founder for more valuable tips, tricks, learning, content and future opportunities
Why Is Multilingual Setup Important?
Today, businesses require a multilingual setup to allow users to communicate in a language of their origin. When a user is not able to communicate and interact properly with your website or application, there’s a gap in creating a nurturing relationship, which impacts your business.
This is why React JS multilingual setup is important because it helps,
- Connect with a large audience. A multilingual setup allows people from various regions to interact with your content and understand your services.
- Decrease the drop rate of your app or website. A visitor who doesn’t understand your language would have an option to change it.
- Improve SERP ranking. Search engines appreciate it when you target a wide audience. This is why multilingual apps help you rank better.
- Enhance brand awareness and improve the image.
Understanding Multilingual Setup in React JS
If you are designing an international app, here’s how you can build multi language support in React JS.
Multilingual Setup in a React JS App: Different Approaches
When you are setting up a multi language app, you can utilize two methods explained below:
Mobile Settings
Using appropriate code and GPS functionality, we can pick the user’s location. Based on the findings, the default language of the app can be set.
For example, for a user from India, regional language can be picked and set as default.
Default Language
While the above method is widely preferred, a popular well-known way is to allow the user to change the language. In this method, the default language of the app is set up. When a user downloads the app or uses a web app, this default language is set in the app. Later, this user gets an option to change the default language.
For example, the default language is set to English. When downloaded for the first time, the app has contents in English. But, the user receives an option under Profile or Settings to modify the default language.
Multilingual Setup in React JS
*In this guide, we have designed a multilingual setup using the second option. This means we will set up English as the default language and provide an option under Profile or Settings to change the language to Norwegian
Every multilingual app setup is a two-stage process.
- 1. Convert static text to a different language as chosen by the user
- 2. Change time and date of the app according to the selected language
Static Text Translation
For static text translation, we are converting the static content of the web app. This includes the following,
- Buttons text
- Application content
- Labels across the application
- Form content (all types of input)
- Validation messages
Let’s go through the process of changing the static text in React JS:
Implementation of Static Text Translation
Similar to our previous blog article React Native multilingual, in ReactJS too, we need to import packages to implement a multilingual setup. Therefore, to start with, we will import two packages for internationalization and localization: react-i18next and i18next.
The i18next package is a JavaScript package, which we can utilize to internationalize our mobile applications.
With the help of the reach-i18next package, we can differentiate translations and place them in different files, which are known namespaces in the i18next context.
To add both i18next and react-i18next packages to React JS, we require a package manager. Usually, developers prefer using NPM or Yarn. In a system that has Node.js, Yarn or NPM Is automatically pre-installed on this system.
Let’s understand these package managers,
Npm is the largest known software registry, which developers from everywhere in the world use to share and borrow packages. It has three components,
- Use the website to look for packages, make profiles, and manage your NPM experience.
- The Command-Line Interface is used to help developers communicate with NPM.
- The Registry hosting meta-information.
Yarn, on the other hand, is another robust package manager used globally. Many programmers prefer Yarn over NPM because of its features and quick execution. The reason why Yarn is quick is that it keeps a cache of your packages and parallelly performs operations. Therefore, Yarn is able to improve the speed of working and resource utilization.
We will use the Yarn package manager for multilingual setup in React JS:
- Firstly, add react-i18next and i18next to the project by using the Yarn manager:
yarn add i18next
yarn add react-i18next
Once you have executed these commands, you need to check in the package.json to ensure that these libraries are in dependencies.
2. After adding the above packages via Yarn package manager, go to App.js and add then import them in the App.js as shown below.
Check how we have added two packages i18next and react-i18next to app.js.
import { I18nextProvider } from 'react-i18next';
import i18next from 'i18next';
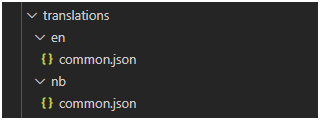
3. Till now, we have only imported libraries to app.js. Now, make a folder with name translation under SRC. Create two separate folders for languages. In our example we are going to have English and Norwegian. Hence create two folders, en and nb under translation folder. For both of these language folders, create and add json files. We have created common.json in our example.
Ideally, we require one common.json file for every language, so you need to make two common.json files for English and Norwegian.
The folder structure may look as below,
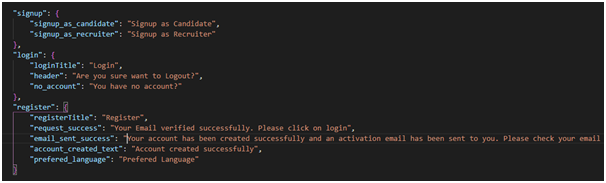
Below is how the common.json may look like,
English(en):
Norwegian(nb):
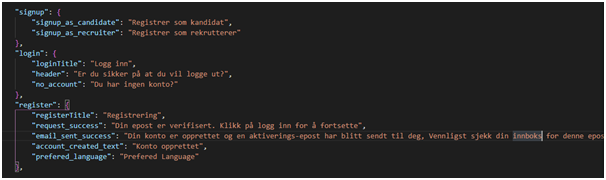
In these common.json files, we have defined text strings for languages the app supports. We have further grouped these strings as per modules or pages to maintain them in a better way.
For example, LoginPage strings are in one section and RegisterPage strings in another. Translated strings are represented as key value pairs as shown above.
4. After successfully creating these resources files for both languages, import these common.json files to app.js.
const common_en = require('./translations/en/common.json');
const common_nb = require('./translations/nb/common.json');
5. Based on the language selection anywhere in the application (any child component), we change the language of the application.
For this, we need to define a function in the Parent component or root component, which is nothing but app.js.
Check the function below,
const render = Component => {
    const lang = (language) => {
        i18next.init({
            interpolation: { escapeValue: false },
            lng: language,
            resources: {
                en: {
                    common: common_en
                },
                nb: {
                    common: common_nb
                }
            }
        });
    };


};
6. Add the below code in app.js which makes the selected language available for all the pages,
ReactDOM.render(
        <I18nextProvider i18n={i18next}>
            <AppContainer>
                <Provider store={store}>
                    <Component lang={(value) => lang(value)} />
                </Provider>
            </AppContainer>
        </I18nextProvider>,
        document.getElementById('root')
    );
7. When the user loads the application or on change of the language, it is stored in the Redux store. From here, the router, which is a wrapper of app.js picks the language from the store variable. Finally, the language of the entire app is changed as per the stored value in the Redux Store. The sample of router component is as shown below,
class Router extends Component {
    constructor(props) {
        super(props);
        const { translation } = this.props;
        const language = translation.get('language');
        this.props.lang(language);
    }

    componentDidUpdate() {
        const { translation } = this.props;
        const language = translation.get('language');
        if (language != '' && language != undefined && language)
            this.props.lang(language);
    }

    render() {
        console.log('router js');

        return (
            <BrowserRouter >
                <ScrollToTop>
                    <App />
                </ScrollToTop>
            </BrowserRouter>
        );
    }
}
Redux store is a store that contains the state tree of our application. If we need to change the state stored in the Redux store, we need to define an action. It is necessary to remember that the Redux store is an object, not a class. Therefore, to make it, the root reducing function should be passed to createStore.
8.Finally, set up your language change option. Two common places where language change can be provided are in Profile or Settings. We can offer a toggle or a drop-down, to change the language selection.
Localization
Localization is a part of the multilingual setup, and it helps in synchronizing the language and the location. According to different markets, localization helps set up date and time.
In this blog article, we will show how to change numbers, time, and date according to the specific region.
Implementation of Localization
In the second step of multilingual setup in React JS, number, date, and time localization is achieved. We need to first import the moment package, similar to i18next and react-i18next.
- In React JS as well, changing time and date is simpler, as it is automatically achieved by the moment package.
Check how to import moment and moment/locale/nb packages(based on the language we support).
import moment from 'moment';
import localization 'moment/locale/nb';
2. Now, make a getFormatedDate helper function to return the date and time string. Here’s what the code looks like,
export const getFormatedDate = (selectedLanguage, date) => {
    if (date) {
        return moment(date).locale(selectedDate, localization).format("L");

        return '';
    }
}
Referring to the above code,
It has a selectedLanguage that reveals the language of your website, such as en or nb.
During this step, you can select the data format, such as dd/mm/yy or dd/mm/yyyy or dd/mmm/yy, etc. You can find this format list here.
Summary
When you want to make a multilingual app in React JS, follow the above steps. Similar to how we have made two common.json files for English and Norwegian, you can create different files for language translations.
If you need guidance for multilanguage support for your mobile application, Desuvit can help. We have some of the leading, skilled, and experienced programmers on our team. Connect to our experts now!
Desuvit is a Norway-born software development company delivering Custom Software Development, Mobile Apps, and Web Applications Development for various verticals and business domains. We offer end-to-end solutions for companies with no software or IT division, Startups, and companies that need to scale their software development efforts but lack the expertise required. We help our clients in growing their businesses so we can grow with them. Some of the technologies we work with: .Net, Azure, Microservices, Azure functions(Serverless computing), React Native, Flutter, React JS, TypeScript, Angular, NServiceBus, Azure Service Bus, Azure Queues, SQL Service, MySQL, Cosmos DB, etc.
Enjoyed this article? Subscribe for more valuable and great content !
By subscribing, you agree with our privacy policy and our terms of service.